Starry Border Panel Quilt
I love to work with fabric panels and come up with easy, no or little math borders that are also beautiful to look at. When I saw the Manger Panel from the Picture a Christmas collection from Riley Blake Designs, I knew I wanted to do a star themed border.
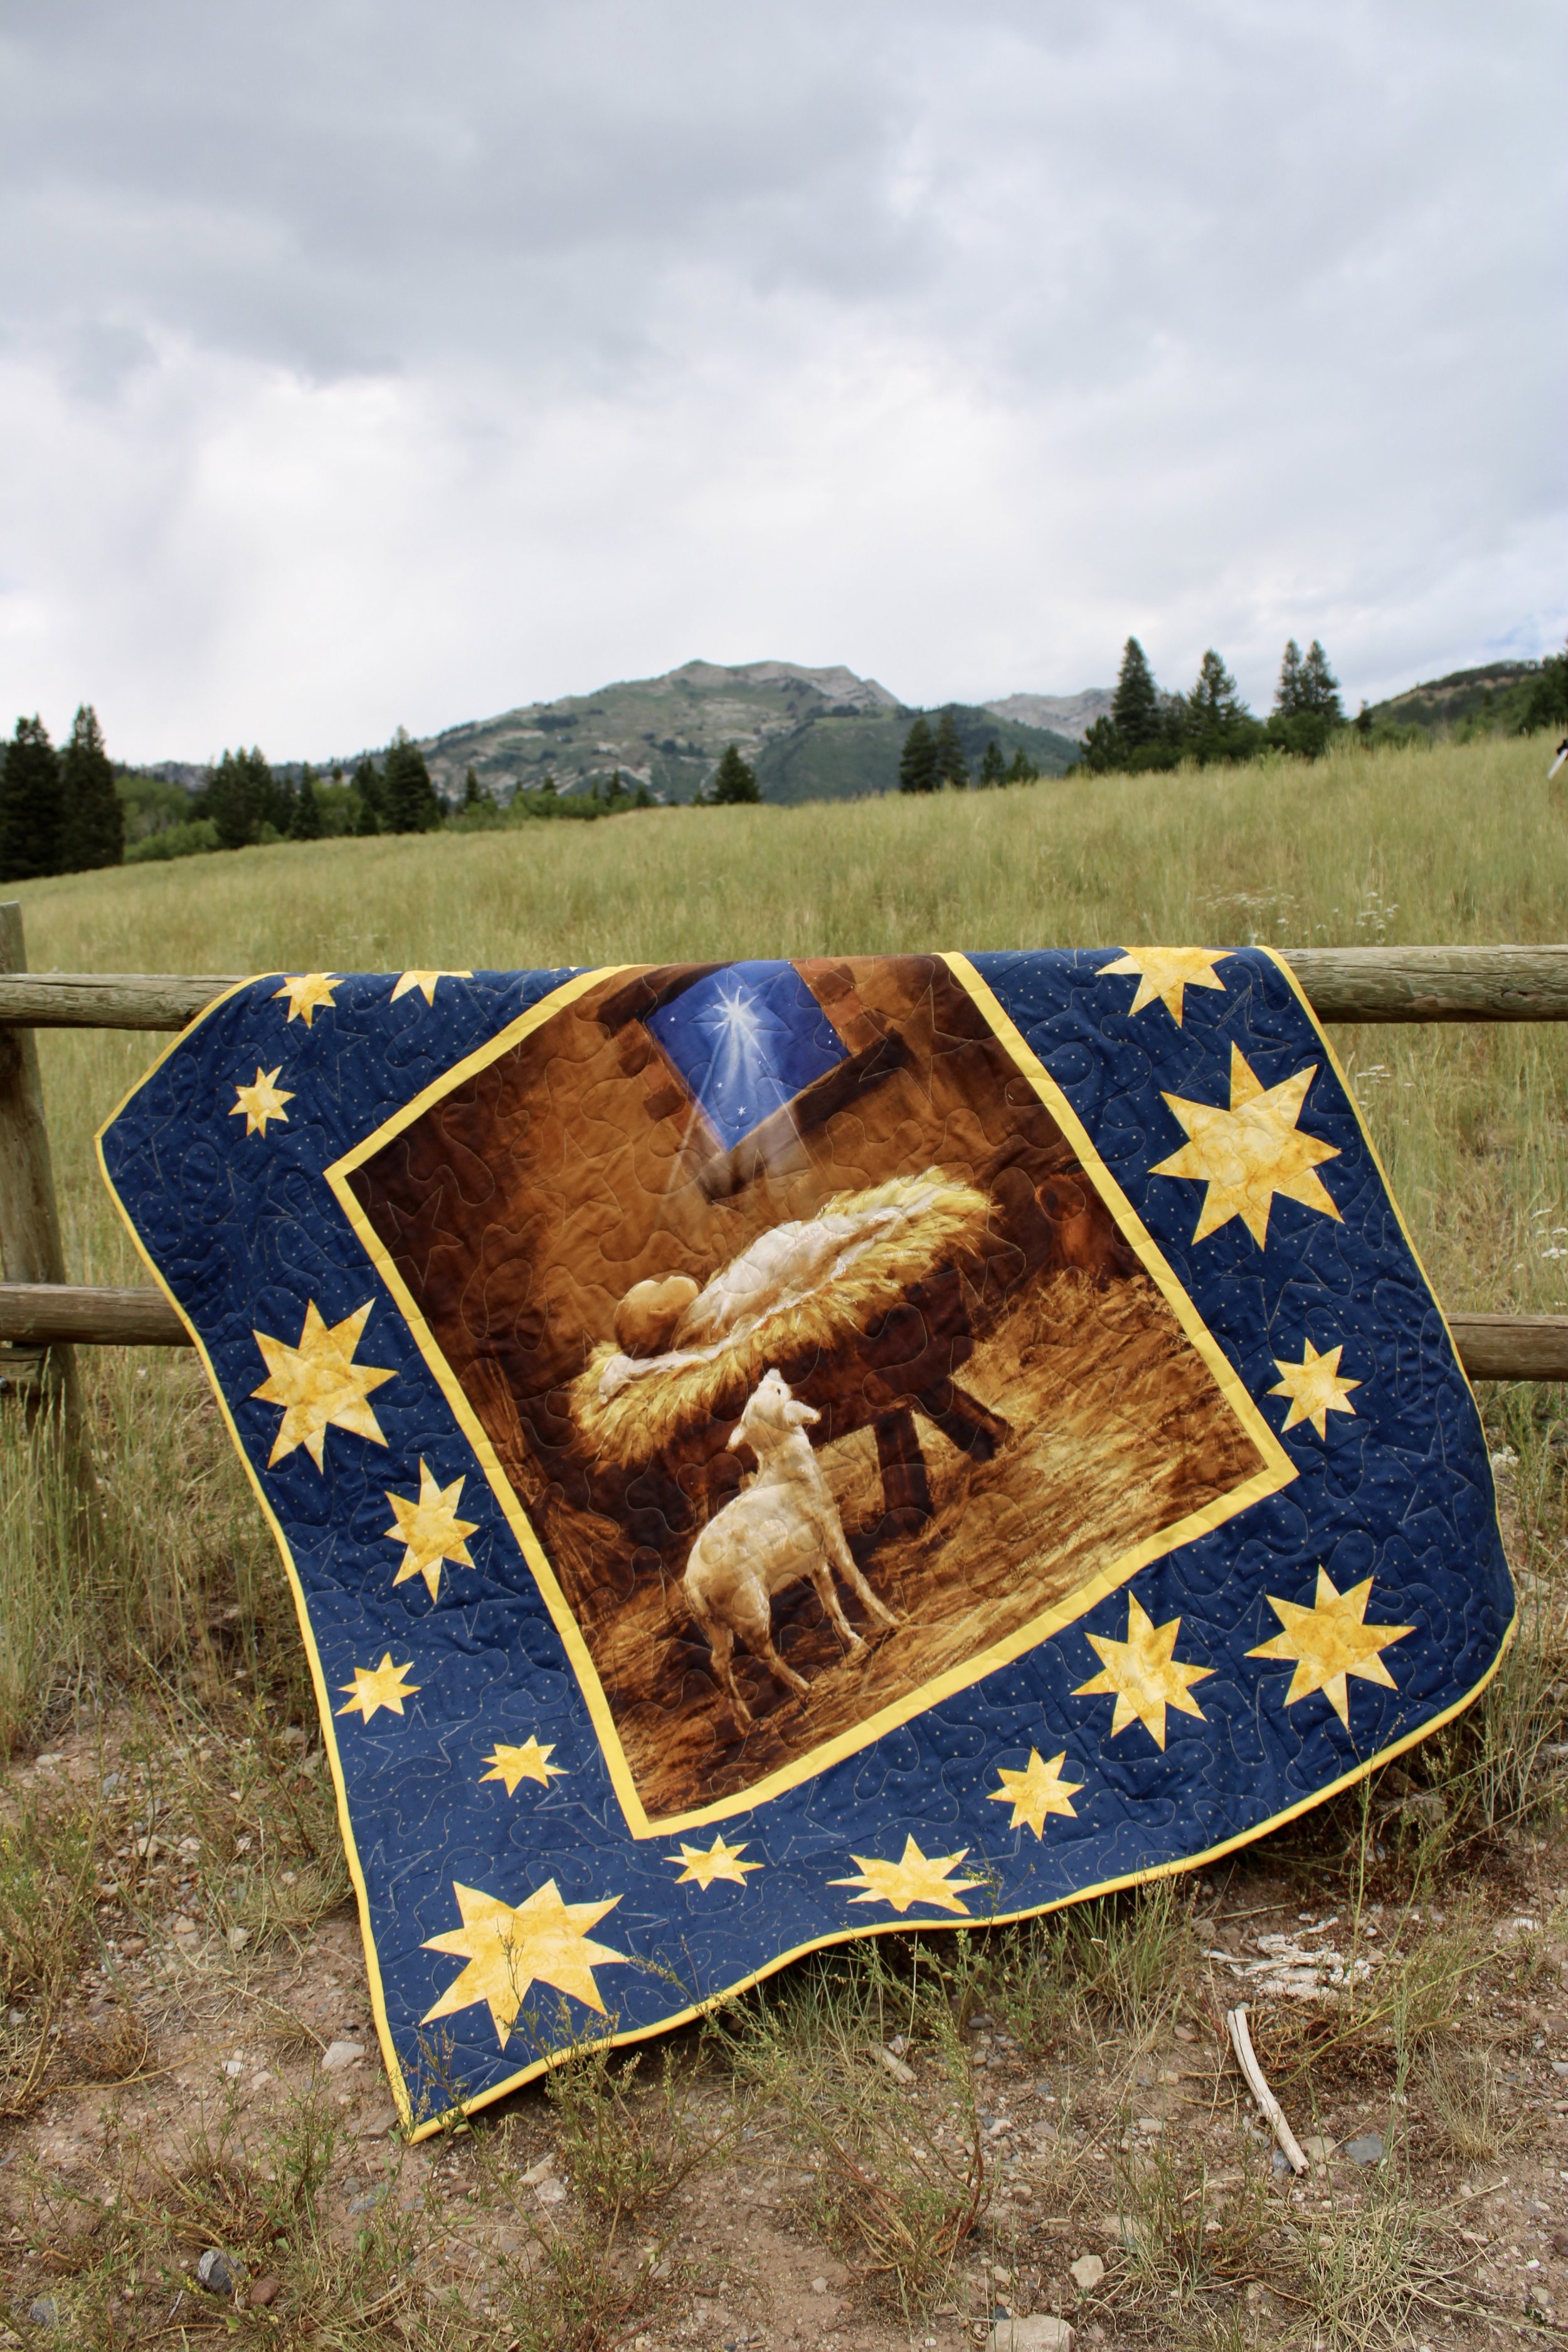
I wanted to keep the border simple so as not to compete with the gorgeous artwork of the fabric panel. Just look at the beautiful details! So the idea came to mind to create “floating stars,” playing off of the night sky seen through the stable window.

I selected Riley Mustard Confetti Cotton for the inner border and binding. I love how the earthy yellow tone brings out the yellows you see in the straw that fills the manger. The fabric used for the stars is Painter’s Watercolor Swirl in Gold by J. Wecker Frisch. The swirly, mottled design in this fabric gives the stars a bit of depth and dimension. The night sky fabric is Navy Sparkler by Melissa Mortenson.

Of course, the border had to be easy to customize and have plenty of wiggle room for those of us who don’t want to stress about the inches not lining up perfectly. I used the free Wonky Star tutorial from Missouri Quilt Co. to quickly put together a border that has the appearance of stars floating in the night sky.
Before starting on the star border, I added a small yellow border using four 1-1/2” strips of Riley Mustard Confetti Cotton.
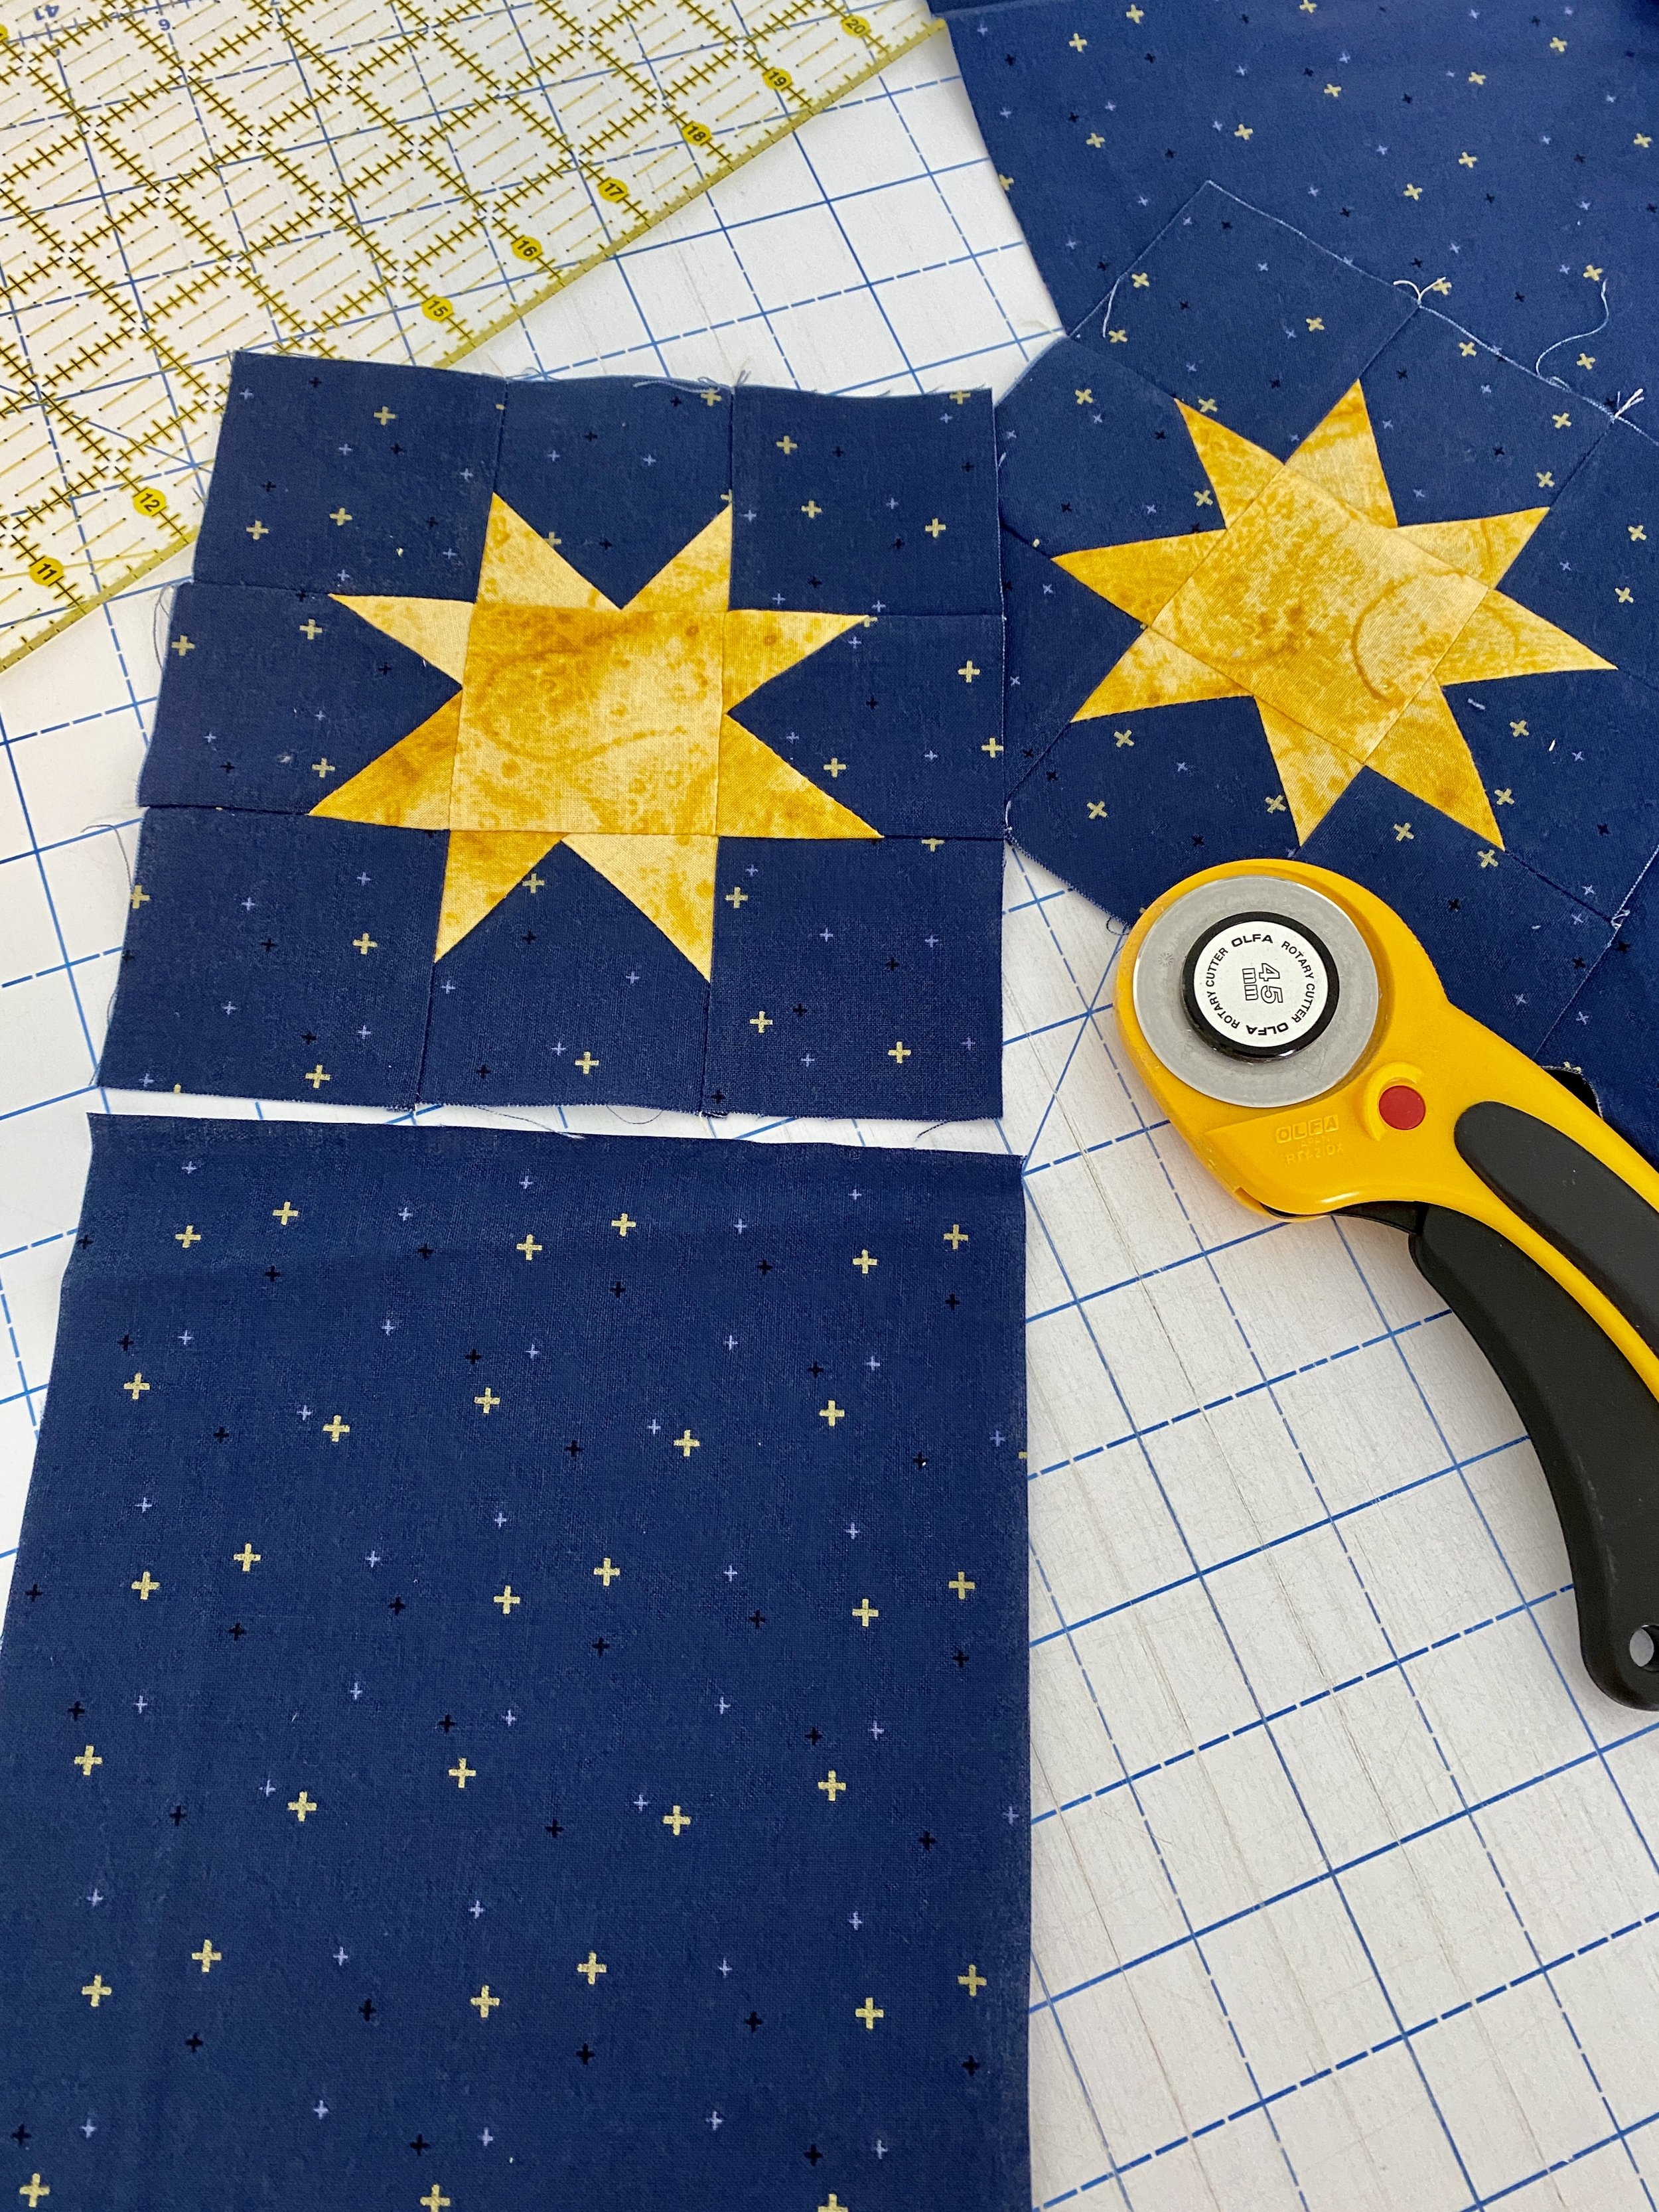
I used the tutorial as basic instruction on how to create the stars, however I changed the measurements to create stars in three different sizes.
For 4 large stars seen in my quilt border, you will need:
32 - 5” squares Navy Sparkler
20 - 5” squares Gold Painter’s Watercolor Swirl
For 8 medium size stars, you will need:
64 - 3-1/2” squares Navy Sparkler
40 - 3-1/2” squares Gold Painter’s Watercolor Swirl
For 8 small stars, you will need:
64 - 2-1/2” squares Navy Sparkler
40 - 2-1/2” squares Gold Painter’s Watercolor Swirl
You can create a border with more stars, fewer stars, larger, or smaller stars. Just know that each individual star requires 8 of the Navy squares and 5 of the Gold squares. The star is a nine patch. Top row is Navy + Star Points + Navy. Middle row is Star Points + Gold square + Star Points. Bottom row is Navy + Star Points + Navy.
The Wonky Star tutorial linked above shows you just how easy it is to create each star block. I love this star block because you don’t have to measure the star points. They are meant to be random and “wonky.”

To create my border, I used my largest star square as a template for the width of the entire border. My trimmed large star measured 13-3/4” square. So that became the border width.
I then laid out all of the stars around the panel so they were situated approximately where I would want them in the finished border. Again, NO measuring here, so my finished result varied just a bit.
After laying it all out, I took this photo and used it for reference as I assembled the border.
For this border, I cut out 2 navy strips measuring the same width of each star x width of fabric. So I had two 13-3/4” strips, two strips the same width as the medium size star, and 2 strips the same width as the small star. I used these strips to start filling in the spaces.
**For my border, I wanted to attach the sides first, then the top and bottom sections. This is important because the side sections only measure the same as the height of the fabric panel, whereas the top and bottom sections need to measure the width of the panel + the width of the side sections. Keep this in mind as you are laying out the stars.
I started with the bottom border strip, but you can start anywhere. Anywhere you start, use the large star in that section as your starting point and work your way out on either side, adding smaller stars.
On the bottom section, I have a small star next to the large star, so I attached the Navy Sparkler fabric strip to one side of the star.

Next, I cut the strip so it was the same height as the large star. That’s it! I continued doing this for all of the stars. Sometimes I added the Navy Sparkler above and below the star so it floated in the middle somewhere, but still I always trimmed it so it was the same height as the large star. I then sewed each individual star strip to each other to form the border strip. If you need space between star sections, you can use the large Navy Sparkler (which measures the same height as the large star) as a filler.

Here are all of border sections attached to the panel. You can see I used the large Navy Sparkler strip on the ends and sometimes in between stars as filler.
Because I arranged my stars so that they were smaller than the length I would need for the finished border strips, I had room to add the extra Navy Sparkler strip to fill in any spaces, making the section the exact length it ultimately needed to be. This is why this border is so forgiving.

I opted to keep the quilting design super simple - also in an effort not to distract from the beautiful fabric panel. I printed out a star on card stock that measures about 5” and used tailor’s chalk and a ruler to trace it randomly over the quilt top.

Here is what the traced stars looked like.

As I quilted over traced stars, I didn’t lift my foot, but continued with a large, open meandering stitch until I reached another star. Then I stitched over that chalk outline, continued with the meandering stitch, and so on.

I did take special care not to quilt over baby Jesus’ face, as I thought that might look odd. The finished quilt measures approximately 64” x 71”, but you can adjust the quilt size to any size you want by adjusting the size of your largest star.

The binding is the same Riley Mustard Confetti Cotton I used for the inner border

I took my dog, Tim with me to photograph this quilt because he loves to run around in the field behind it. I threw a frisbee for him and he wore himself out, and of course, as all dogs do, he decided the best place to rest was on a quilt!

I absolutely LOVE this quilt! I love the dreamy floating star border and I know I’ll be making more of this in the future. And I adore the Manger fabric panel! I’m so glad I could come up with a border that I felt would do it justice. The artwork is truly gorgeous.
